Appearance
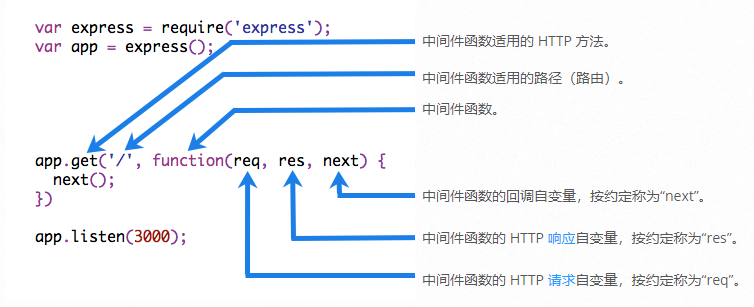
Express 中间件是一种函数,它可以在请求和响应之间进行处理。它可以访问请求对象(req)、响应对象(res)和应用程序的下一个中间件函数(next)。中间件可以用来执行各种任务,例如验证请求、处理错误、记录请求等。做为回调函数接受三个参数
- 请求对象(request对象)
- 响应对象(response对象)
- next函数(在express中定义的用于执行下一个中间件的函数)
中间件作用使用函数封装公共操作,简化代码
- 执行任何代码。
- 对请求和响应对象进行更改。(修改指的是给请求响应对象添加我们自己的属性赋值)
- 结束请求/响应循环。
- 调用堆栈中的下一个中间件。

中间的类型
- 应用层中间件: 应用层中间件是通过 app.use() 和app.METHOD()绑定到应用程序对象的实例, 函数注册的中间件。它们在整个应用程序中都可以使用,并且可以处理所有进入应用程序的请求。应用层中间件可以用于处理身份验证、日志记录、请求解析和其他通用任务。
- 不关心请求路径
js
app.use()- 限定请求路径:
js
app.use(path,fun)- 限定请求方法 + 请求路径:
js
app.get(path,fun)
...- 多个处理函数:
js
app.use('/user/:id', function (req, res, next) {
  console.log('Request URL:', req.originalUrl)
  next()
}, function (req, res, next) {
  console.log('Request Type:', req.method)
  next()
})- 为同一个路径定义多个处理中间件:
js
app.get('/user/:id', function (req, res, next) {
  console.log('ID:', req.params.id)
  next()
}, function (req, res, next) {
  res.send('User Info')
})

// handler for the /user/:id path, which prints the user ID
app.get('/user/:id', function (req, res, next) {
  res.end(req.params.id)
})路由器层中间件: 路由器层中间件是通过 express.Router() 函数创建的路由器对象上注册的中间件。它们只能处理与路由器对象关联的特定路由。路由器层中间件可以用于处理特定路由的身份验证、请求解析和其他任务。
错误处理中间件: 回调函数参数有个四个以将函数标识为错误处理中间件函数,它们专门用于处理应用程序中的错误。当应用程序中发生错误时,错误处理中间件会捕获错误并向客户端发送适当的错误响应。如果将任何内容传递给该next()函数(字符串除外’route’),Express都会将当前请求视为错误,并且将跳过所有剩余的非错误处理路由和中间件函数。
内置中间件: 内置中间件是 Express 框架自带的中间件,可以通过 app.use() 函数直接使用。早期的 Express 内置了很多中间件。后来 Express 在 4.x 之后移除了这些内置中间件,官方把这些功能性中间件以包的形式单独提供出来。这样做的目的是为了保持 Express 本身极简灵活的特性,开发人员可以根据自己的需要去灵活的使用。
- express.json() 解析 Content-Type 为 application/json 格式的请求体
- express.urlencoded() 解析 Content-Type 为 application/x-www-form-urlencoded 格式的请求体
- express.raw() 解析 Content-Type 为 application/octet-stream 格式的请求体
- express.text() 解析 Content-Type 为 text/plain 格式的请求体
- express.static() 托管静态资源文件
- 第三方中间件: 第三方中间件是由第三方开发人员创建的中间件,可以通过 npm 包管理器安装并使用。第三方中间件可以用于处理身份验证、日志记录、请求解析和其他任务。常见的第三方中间件包括 body-parser、cookie-parser、passport 等 更多的中间件参考https://github.com/Raynos/http-framework#modules 或者 https://expressjs.com/en/resources/middleware.html。
| 中间件模块 | 描述 | 替代内置函数(Express 3) |
|---|---|---|
| body-parser | 解析HTTP请求体。参见:body、co-body和raw-body。 | express.bodyParser |
| compression | 压缩HTTP响应。 | express.compress |
| connect-rid | 生成唯一的请求ID。 | NA |
| cookie-parser | 解析cookie头并填充req.cookies。参见cookies和keygrip。 | express.cookieParser |
| cookie-session | 建立基于cookie的会话。 | express.cookieSession |
| cors | 使用各种选项启用跨源资源共享(CORS)。 | NA |
| errorhandler | 开发时的错误处理/调试。 | express.errorHandler |
| method-override | 使用标头覆盖HTTP方法。 | express.methodOverride |
| morgan | HTTP请求日志记录器。 | express.logger |
| multer | 处理多部分表单数据。 | express.bodyParser |
| response-time | 记录HTTP响应时间。 | express.responseTime |
| serve-favicon | 提供一个网站图标。 | express.favicon |
| serve-index | 为给定路径提供目录列表。 | express.directory |
| serve-static | 提供静态文件。 | express.static |
| session | 建立基于服务器的会话(仅限开发)。 | express.session |
| timeout | 为HTTP请求处理设置超时时间。 | express.timeout |
| vhost | 创建虚拟域。 | express.vhost |
| 额外的中间件模块 | 描述 |
|---|---|
| cls-rtracer | 基于CLS的请求ID生成中间件。用于将请求ID添加到日志中。 |
| connect-image-optimus | 优化图片服务。如果可能的话,将图片转换为.webp或.jxr格式。 |
| express-debug | 开发工具,向模板变量(locals)、当前会话等添加信息。 |
| express-partial-response | 基于字段查询字符串过滤JSON响应的部分内容;使用Google API的Partial Response。 |
| express-simple-cdn | 使用CDN提供静态资源,支持多个主机。 |
| express-slash | 处理有和没有尾部斜杠的路由。 |
| express-stormpath | 用户存储、认证、授权、SSO和数据安全。 |
| express-uncapitalize | 将包含大写字母的HTTP请求重定向到规范小写形式。 |
| helmet | 通过设置各种HTTP标头来加强应用程序的安全性。 |
| join-io | 实时合并文件以减少请求次数。 |
| passport | 使用“策略”进行身份验证,如OAuth、OpenID等。有关更多信息,请参见http://passportjs.org/。 |
| static-expiry | 为静态资源指纹URL或缓存头。 |
| view-helpers | 视图的常用辅助方法。 |
| sriracha-admin | 动态生成Mongoose的管理站点。 |
app.use
app.use()是Express.js中的中间件函数,用于将中间件函数绑定到应用程序中的各个路由上,app.use()函数接受多个中间件函数作为参数,多个中间件函数按照调用顺序依次执行。
app.use()函数接受两种类型的参数:中间件函数或路由路径。当传递中间件函数时,该函数将应用于所有请求。例如:
js
app.use((req, res, next) => {
  console.log('Logging...');
  next();
});传递路由路径作为第一个参数时,中间件函数将应用于匹配该路径的请求,路径匹配的中间件是不会对请求方式(method)进行限制。例如:
js
app.use('/api', (req, res, next) => {
  console.log('API Logging...');
  next();
});以上代码将仅在请求路径以“/api”开头时记录日志信息。可以将多个中间件函数和路由路径组合使用:
js
app.use('/api', (req, res, next) => {
  console.log('API Logging...');
  next();
}, (req, res, next) => {
  console.log('API Authentication...');
  next();
});其中,第一个中间件函数仅应用于以“/api”开头的请求,第二个中间件函数应用于满足第一个中间件函数的请求。
案例app.use 和 app.Method 中间件
使用 app.use 和 app.Method 中间件
js
const express = require('express')
const fs = require('fs')

const app = express()

// 定义一个记录ip的中间件
function logIp(req, res, next) {
	console.log(req.ip)
	fs.appendFileSync('ip.txt', req.ip + '\n')
	// 调用next 才能执行下一个中间件
	next()
}

// 记录一个请求时间的中间件
function logTime(req, res, next) {
	console.log(new Date())
	next()
}

// 定义一个请求方法中间件
function logMethod(req, res, next) {
	console.log(req.method)
	next()
}

// 应用中间件 全局性质的
app.use(logIp, logTime)

// 应用中间件 路由局部性质的
app.get('/', logMethod, (req, res) => {
	res.send('hello world')
})

// 这个就只有 logTime logIp 中间件 生效 logMethod不生效
app.get('/user', (req, res) => {
	res.send('user page')
})

// 启动服务
app.listen(3000, () => {
	console.log('server is running at port 3000')
})也可以app.Method 数组
js
var cb0 = function (req, res, next) {
  console.log('CB0');
  next();
}

var cb1 = function (req, res, next) {
  console.log('CB1');
  next();
}

var cb2 = function (req, res) {
  res.send('Hello from C!');
}

app.get('/example/c', [cb0, cb1, cb2]);对next 说明
如果将任何内容传递给该next()函数(字符串除外'route'),Express都会将当前请求视为错误,并且将跳过所有剩余的非错误处理路由和中间件函数,但在
当请求/users/456时,因为userId不等于'123',所以会调用next('route')跳过当前路由函数。Express会继续执行下一个路由函数,即第二个app.get('/users/:id')函数,最终返回一个包含'User not found'的响应。
js
app.get('/users/:id', function(req, res, next) {
  var userId = req.params.id;
  if (userId !== '123') {
    next('route'); // 跳过当前路由函数
  } else {
    res.send('User found');
  }
});

app.get('/users/:id', function(req, res, next) {
  res.send('User not found'); // 这个路由函数会被执行
});中间件函数中使用next('route')跳过当前中间件函数并继续执行下一个中间件函数
错误处理中间件案例
错误处理中间件函数的定义方式与其他中间件函数基本相同,差别在于错误处理函数有四个自变量而不是三个,专门具有特征符 (err, req, res, next),如果将任何内容传递给该next()函数(字符串除外’route’),Express都会将当前请求视为错误,并且将跳过所有剩余的非错误处理路由和中间件函数。
js
app.use(function(err, req, res, next) {
  console.error(err.stack);
  res.status(500).send('Something broke!');
});- 使用next 传递报错信息
js
const express = require('express')
const fs = require('fs')

const app = express()

app.use(function (req, res, next) {
	// 假设用户已经登录,将用户信息存储在 req.user 中
	// 对请求和响应对象进行更改
	req.user = {
		id: 123,
		name: 'John Doe',
		email: 'john@example.com',
		hasPaid: false,
	}
	next()
})

// 错误处理中间件 中间件执行顺序问题这里还不能执行到
// app.use(function (err, req, res, next) {
// 	console.error(err)
// 	res.status('404').send('Something broke!')
// })

app.get(
	'/',
	function checkIfPaidSubscriber(req, res, next) {
		if (!req.user.hasPaid) {
			// continue handling this request
			next('错误信息')
		} else {
			next()
		}
	},
	function getPaidContent(req, res, next) {
		res.json({ name: '123' })
	}
	// 也可以自己内部错误中间件,这样优先自己的不会在走全局的出来
	// function getPaidContent(error, req, res, next) {
	// 	console.log(456)
	// 	res.json({ name: '123' })
	// }
)

// 错误处理中间件 错误中间放到最后执行到了
app.use(function (err, req, res, next) {
	console.error(err) // 错误信息
	res.status('500').send('Something broke!')
})

// 启动服务
app.listen(3000, () => {
	console.log('server is running at port 3000')
})升级案例
js
const express = require('express')

// 创建app对象
const app = express()

app.use(express.json())

// 编写中间件
app.post('/login', (req, res, next) => {
  // 1.获取登录传入的用户名和密码
  const { username, password } = req.body

  // 2.对用户名和密码进行判断
  if (!username || !password) {
    next(-1001)
  } else if (username !== 'coderwhy' || password !== '123456') {
    next(-1002)
  } else {
    res.json({
      code: 0,
      message: '登录成功, 欢迎回来~',
      token: '323dfafadfa3222'
    })
  }
})


// 错误处理的中间件
app.use((errCode, req, res, next) => {
  const code = errCode
  let message = '未知的错误信息'

  switch(code) {
    case -1001:
      message = '没有输入用户名和密码'
      break
    case -1002:
      message = '输入用户名或密码错误'
      break
  }

  res.json({ code, message })
})


// 启动服务器
app.listen(9000, () => {
  console.log('express服务器启动成功~')
})内置中间 express.static
自从 Express 版本 4.x 开始,Express 不再依赖于 Connect 框架。除了 express.static 中间件函数之外,以前 Express 内置的所有中间件函数现在都以单独的模块形式提供。用户可以查看中间件函数列表来获取更多信息。这意味着用户需要手动安装和导入所需的中间件模块,而不是像以前那样直接使用 Express 内置的中间件函数。
js
express.static(root, [options])是在使用 Express 框架中,将静态文件托管到 public 目录下,并将其映射到 /static 路径下。这样相当于我们隐藏了静态文件实际访问路径,我们通过'/static' 重新映射
js
app.use('/static', express.static(__dirname + '/public'));这两个文件的内容都可以直接访问变成静态资源
js
// 内置的中间件: 直接将一个文件夹作为静态资源
app.use(express.static('./uploads'))
app.use(express.static('./build'))| 属性 | 描述 | 类型 | 缺省值 |
|---|---|---|---|
dotfiles | 是否对外输出文件名以点(.)开头的文件。有效值包括“allow”、“deny”和“ignore” | 字符串 | “ignore” |
etag | 启用或禁用 etag 生成 | 布尔 | true |
extensions | 用于设置后备文件扩展名。 | 数组 | [] |
index | 发送目录索引文件。设置为false可禁用建立目录索引。 | 混合 | “index.html” |
lastModified | 将Last-Modified的头设置为操作系统上该文件的上次修改日期。有效值包括true或false。 | 布尔 | true |
maxAge | 设置 Cache-Control 头的 max-age 属性(以毫秒或者ms 格式中的字符串为单位) | 数字 | 0 |
redirect | 当路径名是目录时重定向到结尾的“/”。 | 布尔 | true |
setHeaders | 用于设置随文件一起提供的 HTTP 头的函数。 | 函数 |
dotfiles:该配置项用于控制是否允许输出以点(.)开头的文件名。在 Unix 系统中,以点开头的文件通常被视为隐藏文件,因此默认情况下,serve-static 不会输出这些文件。如果需要输出这些文件,可以将该配置项设置为 allow。如果需要完全禁止输出这些文件,可以将该配置项设置为 deny。如果不需要特殊处理这些文件,可以将该配置项设置为 ignore。
etag:该配置项用于控制是否启用 etag 生成。etag 是一种用于缓存控制的机制,可以根据文件内容生成一个唯一的标识符,用于判断文件是否发生了变化。如果启用 etag 生成,serve-static 会在响应头中添加 ETag 字段。如果禁用 etag 生成,serve-static 不会添加 ETag 字段。
TIP
etag 是 HTTP 协议中的一个头部字段,全称是 Entity Tag。它是由服务器生成的一个唯一标识符,用于标识一个特定的资源(比如一个文件)。当客户端请求该资源时,服务器会将 etag 值发送给客户端。客户端可以在后续的请求中将该值发送给服务器,以便服务器判断该资源是否已经被修改过。如果 etag 值相同,说明资源没有被修改过,服务器可以返回 304 Not Modified 响应,告诉客户端可以使用缓存的版本。
在配置中,etag 参数控制是否启用 etag 生成。默认情况下,etag 参数为 true,表示启用 etag 生成。如果设置为 false,则服务器不会生成 etag 值。如果你的服务器上的资源不会经常修改,可以考虑启用 etag 生成,以便客户端可以使用缓存的版本,减少网络流量和服务器负载。但是如果你的服务器上的资源经常修改,那么 etag 生成会增加服务器负载,不建议启用。
extensions:该配置项用于设置后备文件扩展名。后备文件是指当请求的文件不存在时,serve-static 会尝试查找具有相同文件名但不同扩展名的文件。例如,如果请求的文件是 index.html,但是该文件不存在,serve-static 会尝试查找 index.htm 文件。如果该文件存在,则返回该文件。如果该文件不存在,则继续查找其他后备文件。该配置项的值为一个数组,数组中的每个元素都是一个后备文件扩展名,例如 ['.html', '.htm']。
index:该配置项用于控制是否发送目录索引文件。如果设置为 false,则禁用建立目录索引。如果设置为字符串,则发送该字符串所指定的文件名作为目录索引文件。例如,如果设置为 'index.htm',则 serve-static 会在请求的目录中查找 index.htm 文件,并将其作为目录索引文件返回。
TIP
假设你的服务器上有一个目录 /var/www/html,里面有以下文件:
index.html about.html contact.html 如果你在配置中设置了 index 参数为 true(默认值),那么当客户端请求 http://yourdomain.com/ 时,服务器会发送 /var/www/html/index.html 文件作为响应。如果客户端请求 http://yourdomain.com/about/,服务器会发送 /var/www/html/about/index.html 文件作为响应(如果该文件存在),否则发送 /var/www/html/about.html 文件作为响应。
如果你将 index 参数设置为 false,那么当客户端请求 http://yourdomain.com/ 或 http://yourdomain.com/about/ 时,服务器会发送一个 403 Forbidden 错误。
如果你将 index 参数设置为 'home.html',那么当客户端请求 http://yourdomain.com/ 时,服务器会发送 /var/www/html/home.html 文件作为响应。如果客户端请求 http://yourdomain.com/about/,服务器会发送 /var/www/html/about/home.html 文件作为响应(如果该文件存在),否则发送 /var/www/html/about.html 文件作为响应。
lastModified:该配置项用于控制是否将 Last-Modified 的头设置为操作系统上该文件的上次修改日期。如果启用该配置项,serve-static 会在响应头中添加 Last-Modified 字段。如果禁用该配置项,则不会添加 Last-Modified 字段。
maxAge:该配置项用于设置 Cache-Control 头的 max-age 属性,以毫秒或者 ms 格式中的字符串为单位。max-age 表示缓存时间,即在该时间内,浏览器可以直接从缓存中获取文件,而不需要重新请求服务器。例如,设置为 '1d' 表示缓存时间为一天。
redirect:该配置项用于控制当路径名是目录时,是否重定向到结尾的“/”。如果启用该配置项,serve-static 会将请求重定向到以“/”结尾的路径。如果禁用该配置项,则不会进行重定向。
setHeaders:该配置项用于设置随文件一起提供的 HTTP 头的函数。该函数接收两个参数:res(响应对象)和 path(文件路径)。在该函数中,可以使用 res.setHeader() 方法设置 HTTP 头。例如,可以使用该函数设置 Content-Type 头。
案例
.
|-- app.js
|-- ip.txt
|-- package-lock.json
|-- package.json
`-- public
    |-- css
    |   `-- index.css
`-- index.html默认静态资源 索引是index.html。因此可以直接通过 http://localhost:3000/ 访问程序index.html 页面
js
const express = require('express')
const fs = require('fs')

const app = express()

// 静态资源托管
app.use(express.static('./public'))

// 启动服务
app.listen(3000, () => {
	console.log('server is running at port 3000')
})关于顺序注意事项:
- index.html 文件为默认打开的资源
- 如果静态资源与路由规则同时匹配,谁先匹配谁就响应
- 路由响应动态资源,静态资源中间件响应静态资源
下面案例中即不会执行 app.get('/index.html') 因为我们在public目录下有index.html文件 在这个路由之前所以会先执行
js
//引入express框架
const express = require('express')
//创建服务对象
const app = express()
//静态资源中间件的设置,将当前文件夹下的public目录作为网站的根目录
app.use(express.static('./public')) //当然这个目录中都是一些静态资源
//如果访问的内容经常变化,还是需要设置路由
//但是,在这里有一个问题,如果public目录下有index.html文件,单独也有index.html的路由,
//则谁书写在前,优先执行谁
app.get('/index.html', (request, response) => {
	respsonse.send('首页')
})
//监听端口
app.listen(3000, () => {
	console.log('3000 端口启动....')
})内置中间件处理数据响应
express.json() 和 express.urlencoded() ,因为在以前的版本中,为了解析请求体数据,Express 需要依赖于第三方模块 body-parser。但在 Express 4.x 版本以后,中间件函数 express.json() 和 express.urlencoded() 被添加到了 Express 的核心中,因此不再需要安装和引入 body-parser 模块了,这会将解析后的请求体数据绑定到 req.body 对象中
js
const express = require('express')

// 创建app对象
const app = express()

// 应用一些中间件
app.use(express.json()) // 解析
// 解析传递过来urlencoded的时候, 默认使用的node内置querystring模块
// { extended: true }: 不再使用内置的querystring, 而是使用qs第三方库
app.use(express.urlencoded({ extended: true })) // 解析客户端传递过来的urlencoded

// 编写中间件
app.post('/login', (req, res, next) => {
  console.log(req.body)
  res.end('登录成功, 欢迎回来~')
})

// 启动服务器
app.listen(9000, () => {
  console.log('express服务器启动成功~')
})关于 express.urlencoded() 处理的数据格式
express.urlencoded({ extended: false }) 方法解析的格式是 x-www-form-urlencoded,即 application/x-www-form-urlencoded 格式。这种格式是常用的 HTTP POST 请求数据提交方式,会将 HTTP 请求参数编码为键值对并以多个名称/值对以 & 符号分隔。例如,以下是一个请求数据字符串的示例:
name=John%20Doe&age=25这个字符串对应着两个请求参数:name 和 age,它们分别对应着键值对 name=John%20Doe 和 age=25。在服务器端,express.urlencoded({ extended: false }) 方法可以将这种格式的请求数据解析为一个 JavaScript 对象,以便我们在后续的处理中使用。
当将 extended 参数设置为 true 时,express.urlencoded() 方法可以解析更多的请求数据格式,不再使用内置的querystring, 而是使用qs第三方库。具体来说,它可以处理具有嵌套结构的对象、数组、布尔值和其他复杂的数据类型。例如,如果我们使用以下方式提交的表单数据:
html
<form action="/" method="POST">
  <input type="text" name="user[name]" value="John Doe">
  <input type="text" name="user[age]" value="30">
  <input type="checkbox" name="product[]" value="product1" checked>
  <input type="checkbox" name="product[]" value="product2">
  <input type="radio" name="gender" value="male">
  <input type="radio" name="gender" value="female" checked>
  <input type="submit">
</form>则使用 extended: true 选项解析后得到的数据格式为:
{ user: { name: 'John Doe', age: '30' }, product: ['product1'], gender: 'female' } 从上面的例子可以看出,extended: true 选项可以让我们更方便地处理复杂的表单数据。
写一个简单类似的处理中间件
js
const express = require('express')

const app = express()

// 创建 json 解析中间
app.use(function (req, res, next) {
	// 获取请求体
	if (req.get('content-type') === 'application/json') {
		// 用于获取  方法提交的数据
		let postData = ''
		req.on('data', (chunk) => {
			postData += chunk
		})

		req.on('end', () => {
			req.body = postData.toString()

			console.log(req.body)

			next()
		})
	} else {
		// 不是json 交给其他中间处理
		next()
	}
})

app.get('/json', (req, res) => {
	const json = req.body
	console.log(json)
	res.end('12')
})

app.listen(3000, () => {
	console.log('启动')
})第三方中间件
列举几个第三方中间件的简单使用
获取请求体数据 body-parser
使用 获取请求体数据 body-parser
第一步:安装
shell
npm i body-parserjs
const express = require('express')
const bodyParser = require('body-parser')

const app = express()

// 处理json格式的请求体数据  挂在全局使用
// app.use(bodyParser.json())
// 处理post forrmat格式的请求体数据 挂在全局使用
// app.use(bodyParser.urlencoded({ extended: false }))

// 处理post forrmat格式的请求体数据
const urlencodedParser = bodyParser.urlencoded({ extended: false })

// 配置路由
app.get('/', (req, res) => {
	res.sendFile(__dirname + 'public/index.html')
})

// 处理post请求
app.post('/login', urlencodedParser, (req, res) => {
	console.log(req.body) // 使用了body-parser中间件,可以解析请求体数据 例如{ userName: 'qqq', password: '456' }
	res.send('post login')
})

app.post('/login1', (req, res) => {
	console.log(req.body) // undefined 不能解析请求体数据
	res.send('post login')
})

app.post('/login2', bodyParser.json(), (req, res) => {
	console.log(req.body) // 解析json  例如{ userName: 'qqq', password: '456' }
	res.send('post login')
})

// 启动服务
app.listen(3000, () => {
	console.log('server is running at port 3000')
})文件上传
使用 multer 作为处理 formData 格式,一般上传文件都会采用 formData 数据格式因此使用 中间件对期处理
js
const express = require('express')
const multer = require('multer')

// 创建app对象
const app = express()

// 应用一个express编写第三方的中间件
const upload = multer({
  // dest: './uploads'
  storage: multer.diskStorage({
    destination(req, file, callback) {
      callback(null, './uploads')
    },
    filename(req, file, callback) {
      callback(null, Date.now() + '_' + file.originalname)
    }
  })
})

// 编写中间件
// 上传单文件: single方法
app.post('/avatar', upload.single('avatar') , (req, res, next) => {
  console.log(req.file)
  res.end('文件上传成功~')
})

// 上传多文件:
app.post('/photos', upload.array('photos'), (req, res, next) => {
  console.log(req.files)
  res.end('上传多张照片成功~')
})

// 启动服务器
app.listen(9000, () => {
  console.log('express服务器启动成功~')
})如果只是单纯处理 formData 数据格式并不包含上传可以使用
js
const express = require('express')
const multer = require('multer')

// 创建app对象
const app = express()

// express内置的插件
app.use(express.json())
app.use(express.urlencoded({ extended: true }))

// 编写中间件
const formdata = multer()

app.post('/login', formdata.any(), (req, res, next) => {
  console.log(req.body)
  res.end('登录成功, 欢迎回来~')
})

// 启动服务器
app.listen(9000, () => {
  console.log('express服务器启动成功~')
})请求日志记录 morgan
这段代码使用了Node.js中的fs模块创建了一个可写流writeStream,指定了输出文件为./logs/access.log。然后使用了morgan中间件来记录HTTP请求的日志,其中'combined'表示使用Apache的combined日志格式,{ stream: writeStream }表示将日志输出到之前创建的可写流中,即写入到./logs/access.log文件中。这样做的好处是可以将日志记录到文件中,方便后续的查看和分析
js
const fs = require('fs')
const express = require('express')
const morgan = require('morgan')

// 创建app对象
const app = express()

// 应用第三方中间件
const writeStream = fs.createWriteStream('./logs/access.log')
app.use(morgan('combined', { stream: writeStream }))

// 编写中间件
app.post('/login', (req, res, next) => {
  res.end('登录成功, 欢迎回来~')
})

// 启动服务器
app.listen(9000, () => {
  console.log('express服务器启动成功~')
})关于执行顺序
下面代码在没有匹配到 /home 路由的时候打印顺序为
normal middleware01 normal middleware02 normal middleware03 normal middleware04
当匹配到 /home 时候执行顺序为 normal middleware01 normal middleware02 /home get middleware01 /home get middleware02 normal middleware03 normal middleware04
js
const express = require('express')

const app = express()

// 1.注册两个普通的中间件
app.use((req, res, next) => {
  console.log('normal middleware01')
  next()
})

app.use((req, res, next) => {
  console.log('normal middleware02')
  next()
})


// 2.注册路径path/method的中间件
app.get('/home', (req, res, next) => {
  console.log('/home get middleware01')
  next()
}, (req, res, next) => {
  console.log('/home get middleware02')
  next()
})

app.post('/login', (req, res, next) => {
  console.log('/login post middleware')
  next()
})


// 3.注册普通的中间件
app.use((req, res, next) => {
  console.log('normal middleware03')
  next()
})

app.use((req, res, next) => {
  console.log('normal middleware04')
})


app.listen(9000, () => {
  console.log('express服务器启动成功~')
})